Locks and restraints are among the techniques that I teach at the Romsey Club. In the early 2000s, I introduced these techniques to the syllabus, which lacked them due to its junior-focused design.
I learnt some at the Surrey Kyushindo club and later at the jujitsu clubs in Hampshire.
It was always the same type of teaching at these clubs: you learned many techniques based on how you were trying to apply them. You ended up trying to learn many various locks, each designed for a particular application. I remember at a blue belt Ju-jitsu grading, we were asked, “Show 20 locks”. It was difficult enough trying to remember 20 different ones in a grading, let alone trying this under self-protection stress to apply the ‘right’ one.
I have since realised that it is better to learn a few principles and then apply them through experimentation—i.e., play with them.
So what are these principles?
Concerning martial arts, there are only three types of joints that are locked.
- Hinge Joints
- Ball and Socket Joints
- Glide Joints
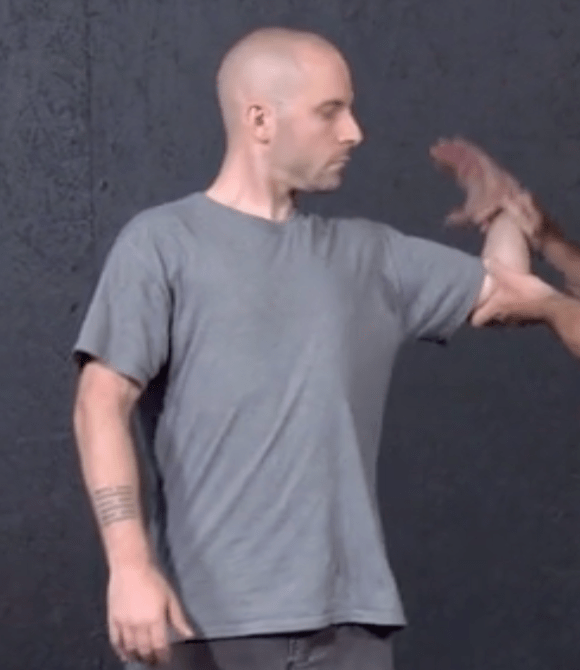
Hinge Joints:
These are joints like the elbow or the knee; they only bend through a restricted range, and to lock them, you use leverage. The fulcrum is the joint, and you place a point of force above the joint (e.g., between the elbow and the shoulder) and the other point of force below the joint (e.g., the wrist), preferably as far away from the joint as possible to get the maximum leverage.
Ball and Socket Joints:
These are joints such as the shoulder or the hip. They are mobile joints, so there are only a limited number of ways to lock them. The easiest way is to extend the limb and bend it at the elbow/knee to 90 degrees. Then, you take the lower part of the limb and move it, keeping the 90-degree angle in the limb.
Can also make the 90-degree angle forward, but there is more twist to the upper arm. If the 90 degrees is not maintained, the opponent can usually force (if less than 90) or worm (if more than 90) their way out of the lock.
The same rule also applies if the arm is behind the back at 90 degrees – don’t push the lower limb up the back towards the head but away, keeping the angle at 90 degrees.
It’s frequently challenging to lock the hip this way due to its strength, and the usual result is that the opponent turns over.
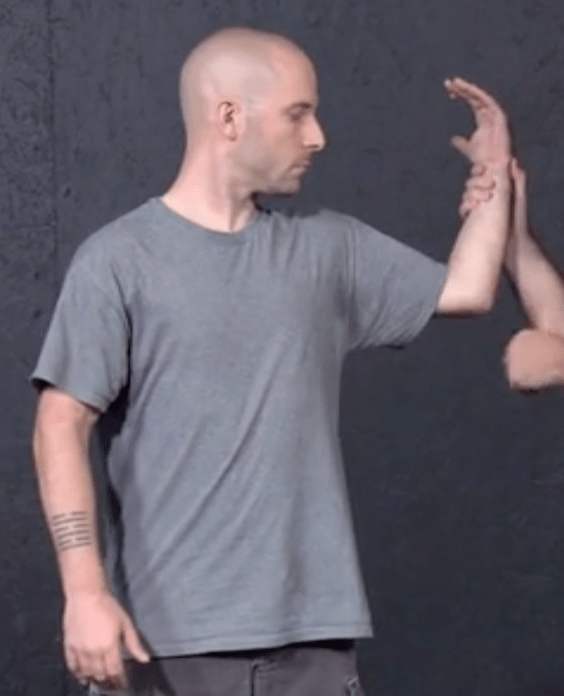
Glide Joints:
Here we are not bone within bone but on bones joined by ligaments. The best example of this is the wrist. You can bend or twist the wrist, or you can combine a bend with a twist to make it more effective. This bend/twist covers all the wrist locks you know or have seen. Try it.
There’s a lot of discussion about whether locks will actually work in self-protection. Almost certainly not in the way that they are usually taught, as under pressure you will not recall a particular lock based on the application.
Also see my post Self Defence – 2: Unrealistic Scenarios
I believe that they should be treated as techniques of opportunity – if a lock presents itself, then take it. A lock-based technique should not be the first thing you should use. The aggressor should be incapacitated first with striking techniques before any lock or restraint is used.

Leave a comment